| C# Sample Programs |
Site Top > C# Sample Programs > C# Sample Programs > ASP.NET Core > Razor Pages
Call WebAPI from screen
05/05/2024
This article deals with ASP.NET Core Razor Pages.
All sample programs in this article are based on the Visual Studio Project template "ASP.NET Core Web App" and you must add the Razor pages in th Pages folder.
TOC
Call WebAPI from screen
This example shows how to call the Web API for person information published in the sample from JavaScript in the browser to obtain information about Shakespeare. If successful, Hamlet will be displayed.
WebAPICaller.cshtml.cs
using Microsoft.AspNetCore.Mvc.RazorPages;

namespace WorkStandard.Pages
{
    public class WebAPICallerModel : PageModel
    {
    }
}
WebAPICaller.cshtml
@page
@model WorkStandard.Pages.WebAPICallerModel

<div class="mb-3">
    <button id="btnInvokeAPI" class="btn btn-primary" value="Invoke WebAPI">Invoke API</button>
</div>
<div id="lblResult" class="fs-1"></div>

<script>
    document.getElementById("btnInvokeAPI").addEventListener("click", function () {
        const url = "https://umayadia-apisample.azurewebsites.net/api/persons/Shakespeare";

        fetch(url, {
            method: "GET",
            headers: {
                "Content-Type": "application/json"
            }
        })
        .then(response => {
            return response.text(); //response is Promise.
        })
        .then(contentText => {
            const lblResult = document.getElementById("lblResult");
            lblResult.textContent = JSON.parse(contentText).data.note;
        });

    });
</script>
The CSS classes...
In this example, WebAPICaller.cshtml could also be written simply as follows.
WebAPICaller.cshtml
@page
@model WorkStandard.Pages.WebAPICallerModel

<div class="mb-3">
    <button id="btnInvokeAPI" class="btn btn-primary" value="Invoke WebAPI">Invoke API</button>
</div>
<div id="lblResult" class="fs-1"></div>

<script>
    document.getElementById("btnInvokeAPI").addEventListener("click", async function() {

        const lblResult = document.getElementById("lblResult");

        const response = await fetch("https://umayadia-apisample.azurewebsites.net/api/persons/Shakespeare")
        lblResult.textContent = (await response.json()).data.note;
    });
</script>
The CSS classes...
Call WebAPI in the project from screen
This example shows how to call WebAPI MyAPI1 defined by MyApi1Controller.cs from JavaScript in the web browser. The JavaScript is described in Screen1.cshtml.
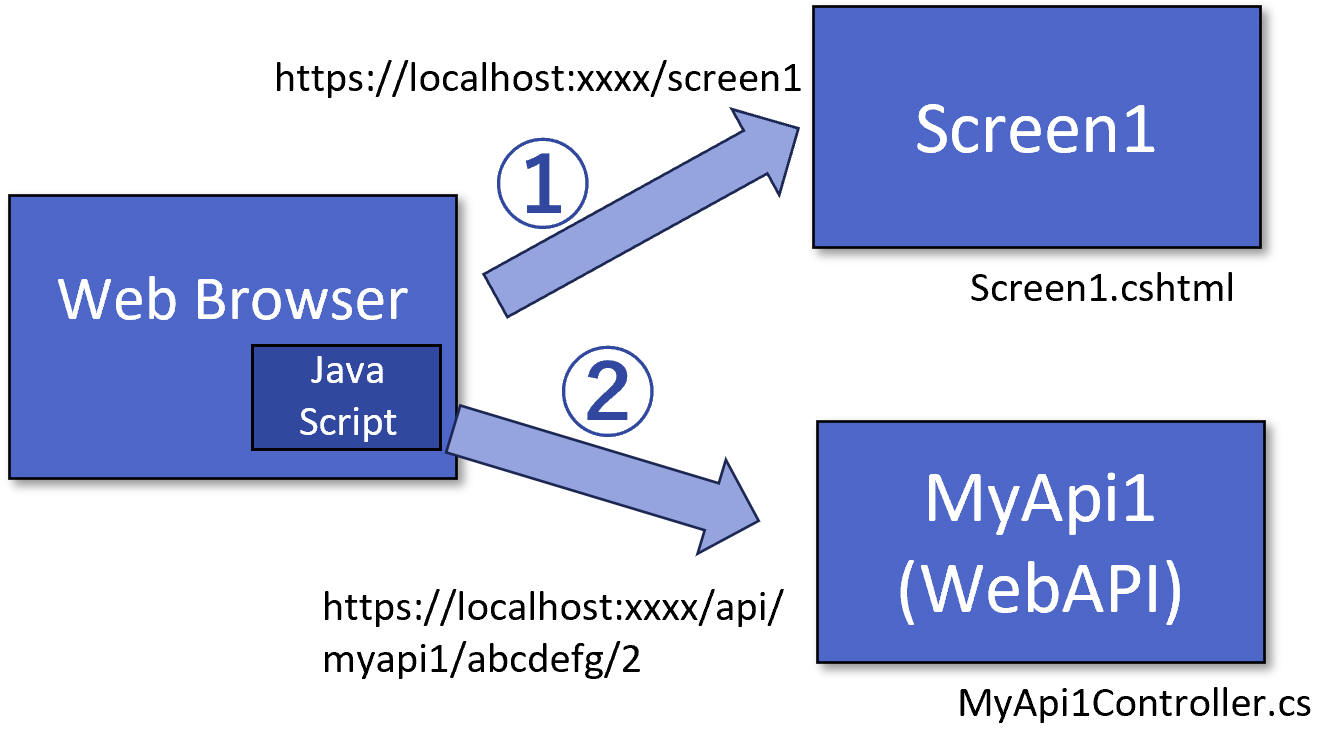
In this example, the function of the WebAPI is just get character at the specified index from the specified text.
Screen1.cshtml.cs
using Microsoft.AspNetCore.Mvc.RazorPages;

namespace WorkStandard.Pages
{
    public class Screen1Model : PageModel
    {
    }
}
Screen1.cshtml
@page
@model WorkStandard.Pages.Screen1Model

<div class="mb-3 col-sm-6">
    <input id="txtText" class="form-control" type="text" value="abcdefg" />
    <input id="txtIndex" class="form-control" type="number" value="2" />
    <button id="btnInvokeAPI" class="btn btn-primary" value="Invoke WebAPI">Invoke API</button>
</div>
<div id="lblResult" class="fs-1"></div>

<script>
    document.getElementById("btnInvokeAPI").addEventListener("click", function () {
        const text = document.getElementById("txtText").value;
        const index = document.getElementById("txtIndex").value;
        const url = `/api/myapi1/${text}/${index}`;

        fetch(url, {
            method: "PUT",
            headers: {
                "Content-Type": "application/json"
            }
        })
        .then(response => {
            return response.text(); //response is Promise.
        })
        .then(contentText => {
            const lblResult = document.getElementById("lblResult");
            lblResult.textContent = JSON.parse(contentText);
        });

    });
</script>
The CSS classes...
- mb-3 Set little margin at bottom.→ Spacing
- col-sm-6 Set the width to 6/12 of the row. If window width narrower than 576px then 100% of the row.→ Grid system
- form-control Make the input a Bootstrap look.→ Forms
- btn btn-primary Give the button a Bootstrap look to indicate that it's a key feature.→ Buttons
- fs-1 Display the font larger.→ Font size
MyApi1Controller.cs
using Microsoft.AspNetCore.Mvc;

namespace WorkStandard.Pages
{
    //You need to add app.MapControllers(); in Program.cs
    [Route("api/[controller]")]
    [ApiController]
    public class MyApi1Controller : ControllerBase
    {
        [HttpPut("{text}/{index}")]
        public char Put(string text, int index)
        {
            return text[index];
        }
    }
}
Note: Easy way to add this api controller is, in the Solution Explorer, right click Pages folder and [Add] - [New Item] - [API Controller - Empty]
Program.cs
var builder = WebApplication.CreateBuilder(args);

// Add services to the container.
builder.Services.AddRazorPages();

var app = builder.Build();

// Configure the HTTP request pipeline.
if (!app.Environment.IsDevelopment())
{
    app.UseExceptionHandler("/Error");
    // The default HSTS value is 30 days. You may want to change this for production scenarios, see https://aka.ms/aspnetcore-hsts.
    app.UseHsts();
}

app.UseHttpsRedirection();
app.UseStaticFiles();

app.UseRouting();

app.UseAuthorization();

app.MapRazorPages();
app.MapControllers(); //← Add this

app.Run();
Call WebAPI in the project with CSRF protection from screen
This example shows how to call WebAPI MyAPI2 defined by MyApi2Controller.cs from JavaScript in the web browser. The JavaScript is described in Screen2.cshtml.
The MyAPI2 is protected from CSRF attack by ValidateAntiForgeryToken attribute.
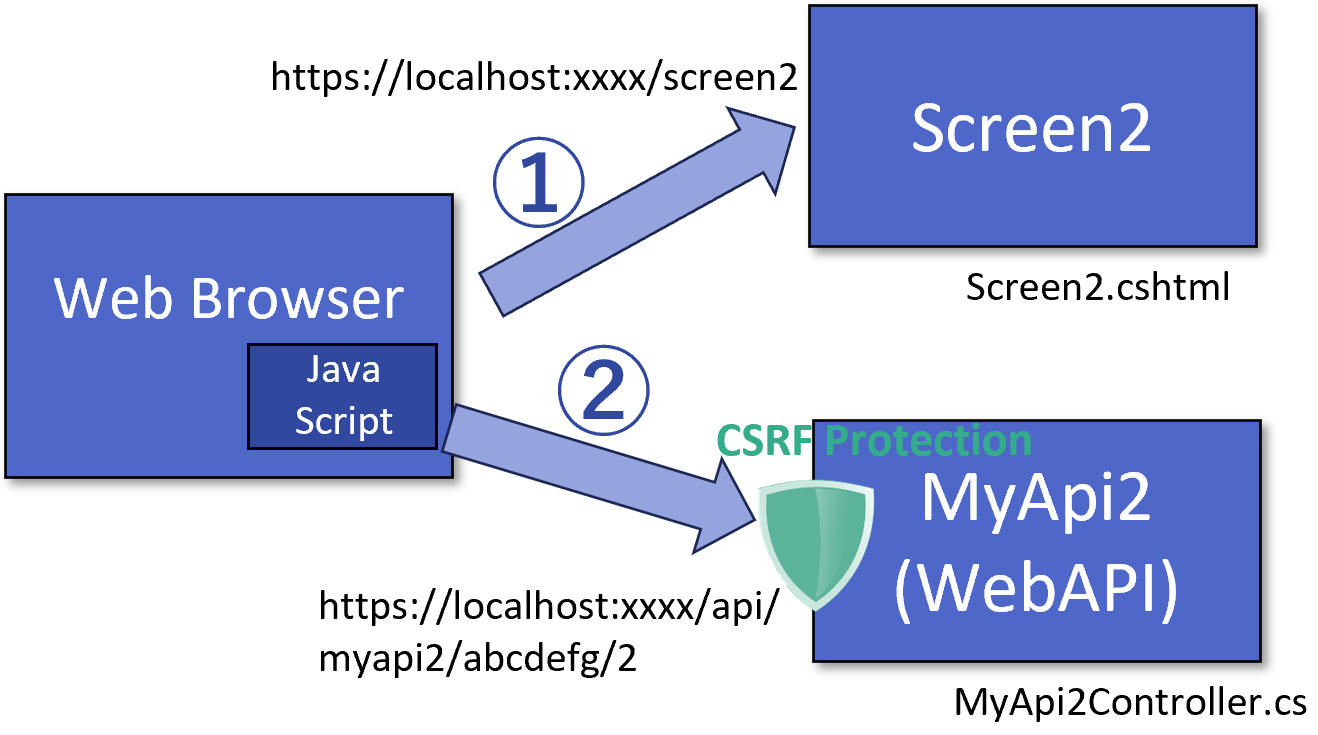
In this example, the function of the WebAPI is just get character at the specified index from the specified text.
Screen2.cshtml.cs
using Microsoft.AspNetCore.Mvc.RazorPages;

namespace WorkStandard.Pages
{
    public class Screen2Model : PageModel
    {
    }
}
Screen2.cshtml
@page
@model WorkStandard.Pages.Screen2Model
@inject Microsoft.AspNetCore.Antiforgery.IAntiforgery Antiforgery
@{
    string? requestToken = Antiforgery.GetAndStoreTokens(HttpContext).RequestToken;
}

<div class="mb-3 col-sm-6">
    <input id="txtText" class="form-control" type="text" value="abcdefg" />
    <input id="txtIndex" class="form-control" type="number" value="2" />
    <button id="btnInvokeAPI" class="btn btn-primary" value="Invoke WebAPI">Invoke API</button>
</div>
<div id="lblResult" class="fs-1"></div>

<script>
    document.getElementById("btnInvokeAPI").addEventListener("click", function () {
        const text = document.getElementById("txtText").value;
        const index = document.getElementById("txtIndex").value;
        const url = `/api/myapi2/${text}/${index}`;

        fetch(url, {
            method: "PUT",
            headers: {
                "Content-Type": "application/json",
                "RequestVerificationToken": "@requestToken"
            }
        })
        .then(response => {
            return response.text(); //response is Promise.
        })
        .then(contentText => {
            const lblResult = document.getElementById("lblResult");
            lblResult.textContent = JSON.parse(contentText);
        });

    });
</script>
The CSS classes...
- mb-3 Set little margin at bottom.→ Spacing
- col-sm-6 Set the width to 6/12 of the row. If window width narrower than 576px then 100% of the row.→ Grid system
- form-control Make the input a Bootstrap look.→ Forms
- btn btn-primary Give the button a Bootstrap look to indicate that it's a key feature.→ Buttons
- fs-1 Display the font larger.→ Font size
MyApi2Controller.cs
using Microsoft.AspNetCore.Mvc;

namespace WorkStandard.Pages
{
    //You need to add app.MapControllers(); in Program.cs
    [ValidateAntiForgeryToken]
    [Route("api/[controller]")]
    [ApiController]
    public class MyApi2Controller : ControllerBase
    {
        [HttpPut("{text}/{index}")]
        public char Put(string text, int index)
        {
            return text[index];
        }
    }
}
Note: Easy way to add this api controller is, in the Solution Explorer, right click Pages folder and [Add] - [New Item] - [API Controller - Empty]
Program.cs
var builder = WebApplication.CreateBuilder(args);

// Add services to the container.
builder.Services.AddRazorPages();

var app = builder.Build();

// Configure the HTTP request pipeline.
if (!app.Environment.IsDevelopment())
{
    app.UseExceptionHandler("/Error");
    // The default HSTS value is 30 days. You may want to change this for production scenarios, see https://aka.ms/aspnetcore-hsts.
    app.UseHsts();
}

app.UseHttpsRedirection();
app.UseStaticFiles();

app.UseRouting();

app.UseAuthorization();

app.MapRazorPages();
app.MapControllers(); //← Add this

app.Run();