| C# サンプル集 |
Visual Basic 中学校 > C# サンプル集 > C# サンプル集目次 > ASP.NET Core > Razor Pages
WebAPIを画面から呼び出す
2024/5/5
この記事は ASP.NET Core Razor Pages を対象にしています。
この記事内のサンプルは、プロジェクトテンプレート「ASP.NET Core Web アプリ」を使用して、PagesフォルダーにこのRazorページを追加する前提です。
WebAPIを画面から呼び出す
この例ではブラウザー内のJavaScriptからサンプルで公開されている人物情報のWebAPIを呼び出して、シェークスピア(Shakespeare)の情報を取得します。成功すると Hamlet と表示されます。
WebAPICaller.cshtml.cs
using Microsoft.AspNetCore.Mvc.RazorPages;

namespace WorkStandard.Pages
{
    public class WebAPICallerModel : PageModel
    {
    }
}
WebAPICaller.cshtml
@page
@model WorkStandard.Pages.WebAPICallerModel

<div class="mb-3">
    <button id="btnInvokeAPI" class="btn btn-primary" value="WebAPI呼び出し">Invoke API</button>
</div>
<div id="lblResult" class="fs-1"></div>

<script>
    document.getElementById("btnInvokeAPI").addEventListener("click", function () {
        const url = "https://umayadia-apisample.azurewebsites.net/api/persons/Shakespeare";

        fetch(url, {
            method: "GET",
            headers: {
                "Content-Type": "application/json"
            }
        })
        .then(response => {
            return response.text(); //response は Promise です
        })
        .then(contentText => {
            const lblResult = document.getElementById("lblResult");
            lblResult.textContent = JSON.parse(contentText).data.note;
        });

    });
</script>
主なCSSクラスの効果
この例では WebAPICaller.cshtml を次のように簡略に記述することもできます。
WebAPICaller.cshtml
@page
@model WorkStandard.Pages.WebAPICallerModel

<div class="mb-3">
    <button id="btnInvokeAPI" class="btn btn-primary" value="WebAPI呼び出し">Invoke API</button>
</div>
<div id="lblResult" class="fs-1"></div>

<script>
    document.getElementById("btnInvokeAPI").addEventListener("click", async function() {

        const lblResult = document.getElementById("lblResult");

        const response = await fetch("https://umayadia-apisample.azurewebsites.net/api/persons/Shakespeare")
        lblResult.textContent = (await response.json()).data.note;
    });
</script>
主なCSSクラスの効果
プロジェクト内のWebAPIを画面から呼び出す
この例ではブラウザー内のJavaScriptからMyApi1Controller.csで定義しているWebAPI MyAPI1 を呼び出します。そのJavaScriptはScreen1.cshtmlに記述しています。
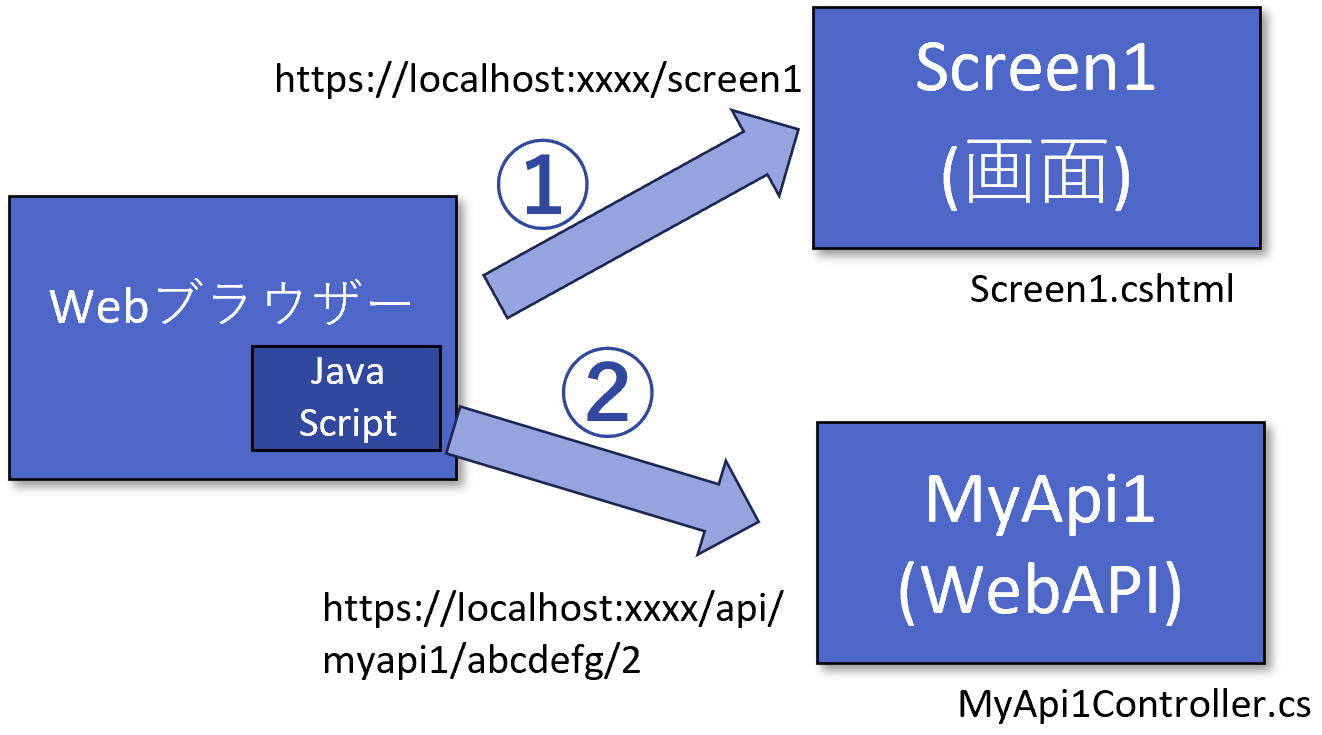
このサンプルではWebAPIの機能は指定した文字列の指定した位置にある1文字を返すだけです。
Screen1.cshtml.cs
using Microsoft.AspNetCore.Mvc.RazorPages;

namespace WorkStandard.Pages
{
    public class Screen1Model : PageModel
    {
    }
}
Screen1.cshtml
@page
@model WorkStandard.Pages.Screen1Model

<div class="mb-3 col-sm-6">
    <input id="txtText" class="form-control" type="text" value="abcdefg" />
    <input id="txtIndex" class="form-control" type="number" value="2" />
    <button id="btnInvokeAPI" class="btn btn-primary" value="WebAPI呼び出し">Invoke API</button>
</div>
<div id="lblResult" class="fs-1"></div>

<script>
    document.getElementById("btnInvokeAPI").addEventListener("click", function () {
        const text = document.getElementById("txtText").value;
        const index = document.getElementById("txtIndex").value;
        const url = `/api/myapi1/${text}/${index}`;

        fetch(url, {
            method: "PUT",
            headers: {
                "Content-Type": "application/json"
            }
        })
        .then(response => {
            return response.text(); //response は Promise です
        })
        .then(contentText => {
            const lblResult = document.getElementById("lblResult");
            lblResult.textContent = JSON.parse(contentText);
        });

    });
</script>
主なCSSクラスの効果
- mb-3 下に少し余白(margin)を設けます。→ 余白
- col-sm-6 幅を行の6/12にします。ウィンドウ幅が576px(sm)より小さい場合は100%にします。→ グリッドシステム
- form-control inputをBootstrapの外観にします。→ Bootstrapのフォームの概要
- btn btn-primary ボタンをBootstrapの外観にして、主要な機能であることを示します。→ ボタン
- fs-1 大きいフォントで表示します。→ フォントサイズ
MyApi1Controller.cs
using Microsoft.AspNetCore.Mvc;

namespace WorkStandard.Pages
{
    //Program.cs内に app.MapControllers(); を追加する必要があります。
    [Route("api/[controller]")]
    [ApiController]
    public class MyApi1Controller : ControllerBase
    {
        [HttpPut("{text}/{index}")]
        public char Put(string text, int index)
        {
            return text[index];
        }
    }
}
メモ:ソリューションエクスプローラーで、Pagesフォルダーを右クリックして、[追加] - [新しい項目] - [APIコントローラー-空]から追加すると簡単です。
Program.cs
var builder = WebApplication.CreateBuilder(args);

// Add services to the container.
builder.Services.AddRazorPages();

var app = builder.Build();

// Configure the HTTP request pipeline.
if (!app.Environment.IsDevelopment())
{
    app.UseExceptionHandler("/Error");
    // The default HSTS value is 30 days. You may want to change this for production scenarios, see https://aka.ms/aspnetcore-hsts.
    app.UseHsts();
}

app.UseHttpsRedirection();
app.UseStaticFiles();

app.UseRouting();

app.UseAuthorization();

app.MapRazorPages();
app.MapControllers(); //← これを追加

app.Run();
CSRF対策で保護しているプロジェクト内のWebAPIを画面から呼び出す
この例ではブラウザー内のJavaScriptからMyApi2Controller.csで定義しているWebAPI MyAPI2 を呼び出します。そのJavaScriptはScreen2.cshtmlに記述しています。
MyAPI2はValidateAntiForgeryToken属性を使ってCSRF攻撃対策をしています。
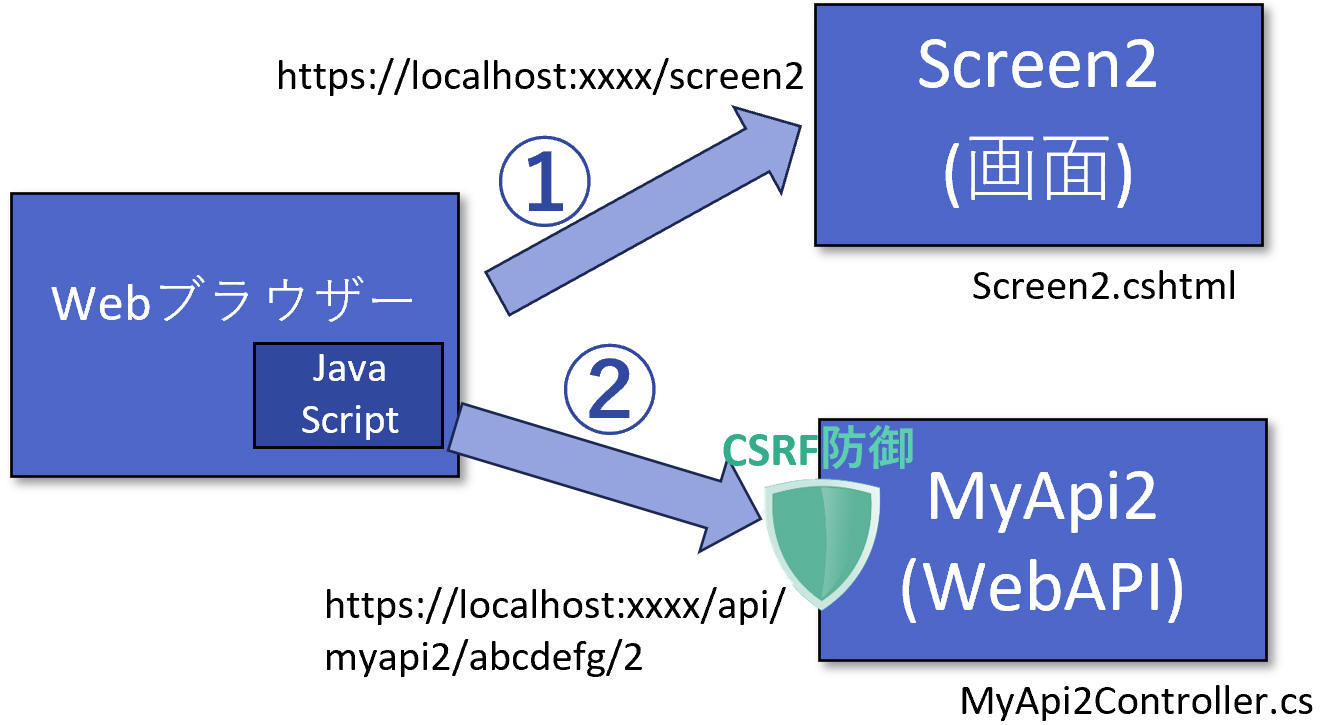
このサンプルではWebAPIの機能は指定した文字列の指定した位置にある1文字を返すだけです。
Screen2.cshtml.cs
using Microsoft.AspNetCore.Mvc.RazorPages;

namespace WorkStandard.Pages
{
    public class Screen2Model : PageModel
    {
    }
}
Screen2.cshtml
@page
@model WorkStandard.Pages.Screen2Model
@inject Microsoft.AspNetCore.Antiforgery.IAntiforgery Antiforgery
@{
    string? requestToken = Antiforgery.GetAndStoreTokens(HttpContext).RequestToken;
}

<div class="mb-3 col-sm-6">
    <input id="txtText" class="form-control" type="text" value="abcdefg" />
    <input id="txtIndex" class="form-control" type="number" value="2" />
    <button id="btnInvokeAPI" class="btn btn-primary" value="WebAPI呼び出し">Invoke API</button>
</div>
<div id="lblResult" class="fs-1"></div>

<script>
    document.getElementById("btnInvokeAPI").addEventListener("click", function () {
        const text = document.getElementById("txtText").value;
        const index = document.getElementById("txtIndex").value;
        const url = `/api/myapi2/${text}/${index}`;

        fetch(url, {
            method: "PUT",
            headers: {
                "Content-Type": "application/json",
                "RequestVerificationToken": "@requestToken"
            }
        })
        .then(response => {
            return response.text(); //response は Promise です
        })
        .then(contentText => {
            const lblResult = document.getElementById("lblResult");
            lblResult.textContent = JSON.parse(contentText);
        });

    });
</script>
主なCSSクラスの効果
- mb-3 下に少し余白(margin)を設けます。→ 余白
- col-sm-4 幅を行の4/12にします。ウィンドウ幅が576px(sm)より小さい場合は100%にします。→ グリッドシステム
- form-control inputをBootstrapの外観にします。→ Bootstrapのフォームの概要
- btn btn-primary ボタンをBootstrapの外観にして、主要な機能であることを示します。→ ボタン
- fs-1 大きいフォントで表示します。→ フォントサイズ
MyApi2Controller.cs
using Microsoft.AspNetCore.Mvc;

namespace WorkStandard.Pages
{
    //Program.cs内に app.MapControllers(); を追加する必要があります。
    [ValidateAntiForgeryToken]
    [Route("api/[controller]")]
    [ApiController]
    public class MyApi2Controller : ControllerBase
    {
        [HttpPut("{text}/{index}")]
        public char Put(string text, int index)
        {
            return text[index];
        }
    }
}
メモ:ソリューションエクスプローラーで、Pagesフォルダーを右クリックして、[追加] - [新しい項目] - [APIコントローラー-空]から追加すると簡単です。
Program.cs
var builder = WebApplication.CreateBuilder(args);

// Add services to the container.
builder.Services.AddRazorPages();

var app = builder.Build();

// Configure the HTTP request pipeline.
if (!app.Environment.IsDevelopment())
{
    app.UseExceptionHandler("/Error");
    // The default HSTS value is 30 days. You may want to change this for production scenarios, see https://aka.ms/aspnetcore-hsts.
    app.UseHsts();
}

app.UseHttpsRedirection();
app.UseStaticFiles();

app.UseRouting();

app.UseAuthorization();

app.MapRazorPages();
app.MapControllers(); //← これを追加

app.Run();