![]()
![]()
![]()
Visual Basic 中学校 > Visual Basic サンプル集 > Visual Basic サンプル集目次 >
画像をエンボス処理する
 |
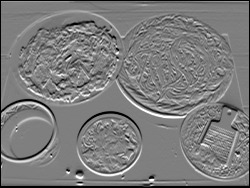 |
| 処理前 | 処理後 |
以下の関数Embossを使用すると、画像にエンボス効果(=浮き彫りのような効果)を 加えることができる。使用例はすぐ下にある。
![]()
![]()
![]()
|
Private
Enum EmbossDirection UpLeft Up UpRight Left Right DownLeft Down DownRight End Enum |
|
'''■Emboss ''' <summary>画像にエンボス処理を行う。</summary> ''' <param name="SourceImage">元となる画像</param> ''' <param name="Direction">光源の方向</param> ''' <param name="Depth">彫りの深さ</param> ''' <returns>エンボス処理された画像</returns> ''' <remarks>エンボス処理とは浮き彫りのような効果のこと</remarks> Private Function Emboss(ByVal SourceImage As Image, Optional ByVal Direction As EmbossDirection = EmbossDirection.UpLeft, Optional ByVal Depth As Integer = 1) As Bitmap
Dim Kernel(,)
As Integer =
CType(Array.CreateInstance(GetType(Integer),
3, 3), Integer(,)) '▼光源の方向を設定 BMP = ApplyKernel(SourceImage, Kernel, 1, 127, 127, 127) Return Monotone(BMP) End Function |
|
'''■ApplyKernel ''' <summary>正方行列を使って色変換処理を行う。</summary> ''' <param name="SourceImage">元となる画像</param> ''' <param name="Kernel">使用する正方行列</param> ''' <param name="Weight">重み。通常、重みは正方行列の要素の値の合計。</param> ''' <param name="RUpper">省略可。赤の要素の増分を指定。</param> ''' <param name="GUpper">省略可。緑の要素の増分を指定。</param> ''' <param name="BUpper">省略可。青の要素の増分を指定。</param> ''' <returns>処理後の画像を返します。</returns> ''' <remarks></remarks> Private Function ApplyKernel(ByVal SourceImage As Image, ByVal Kernel(,) As Integer, ByVal Weight As Integer, Optional ByVal RUpper As Integer = 0, Optional ByVal GUpper As Integer = 0, Optional ByVal BUpper As Integer = 0) As Bitmap
Dim i
As Integer BMP1 =
CType(SourceImage,
Bitmap) For
i = 1 To BMP1.Height - Edge
R = 0
'ドット(j, i)の新しい色を算出します。
'R, G, Bの値が0~255の範囲に収まるように調節します。 BMP2.SetPixel(j, i, Color.FromArgb(R, G, B))
Next j Return BMP2 End Function |
|
'''■Monotone ''' <summary>画像を白黒にする。</summary> ''' <param name="SourceImage">元となる画像</param> ''' <returns>白黒画像</returns> ''' <remarks></remarks> Private Function Monotone(ByVal SourceImage As Image) As Bitmap
Dim DestImage As
New Bitmap(SourceImage.Width, SourceImage.Height) M.Matrix00 = 0.333F Attr.SetColorMatrix(M) g.DrawImage(SourceImage, New Rectangle(New Point, SourceImage.Size), 0, 0, SourceImage.Width, SourceImage.Height, GraphicsUnit.Pixel, Attr) Return DestImage End Function |
|
'''■RGBRange ''' <summary>値を0~255の範囲になるように調節します。</summary> ''' <param name="Value">調節前の値を指定します。</param> ''' <returns>調節後の値を返します。この値は必ず0~255の範囲内です。</returns> ''' <remarks></remarks> Private Function RGBRange(ByVal Value As Integer) As Integer
Select Case Value End Function |
メモ:
・この例では画像の「へり」の部分にはエンボス効果がかかりません。「へり」の幅は1ピクセルです。
・この処理には時間がかかります。大量の画像を処理する場合は実用に耐えません。
・このサンプル中のApplyKernel関数、Monotone関数、RGBRange関数は他のサンプルに登場する同名の関数とまったく同じ内容です。
使用例:PictureBox1の画像にエンボス処理をする例
![]()
![]()
![]()
| Me.Cursor
= Cursors.WaitCursor PictureBox1.Image = Emboss(PictureBox1.Image) Me.Cursor = Cursors.Default |
メモ:PictureBox1にはあらかじめ画像を読み込んでおくなどしてImageプロパティに値をセットしておく必要があります。
![]() VB6でも同じような手法で実現できます。処理速度向上のためにWindows API関数のGetDIBitsやSetDIBitsを
使用します。
VB6でも同じような手法で実現できます。処理速度向上のためにWindows API関数のGetDIBitsやSetDIBitsを
使用します。